Flexible cystoscopy
Indications:
Diagnostic - assessment of haematuria, urethral strictures, followup of bladder cancer, visualisation of retained foreign bodies and bladder stones.
Therapeutic - guided catheterisation - using the working channel on the scope to insert a guidewire, removal of ureteric stents, intravesical Botox injections
Risks:
Infection
Bleeding
Post-procedure discomfort
Urinary retention
As in the case of catheterisation, the steps for cystoscopy in males are outlined below. This is because cystoscopy in women is much more straightforward, owing to the shorter length of the urethra and it being a straight passage.
Ideally, the patient should have an empty bladder before cystoscopy and have a negative urine dipstick for infection.
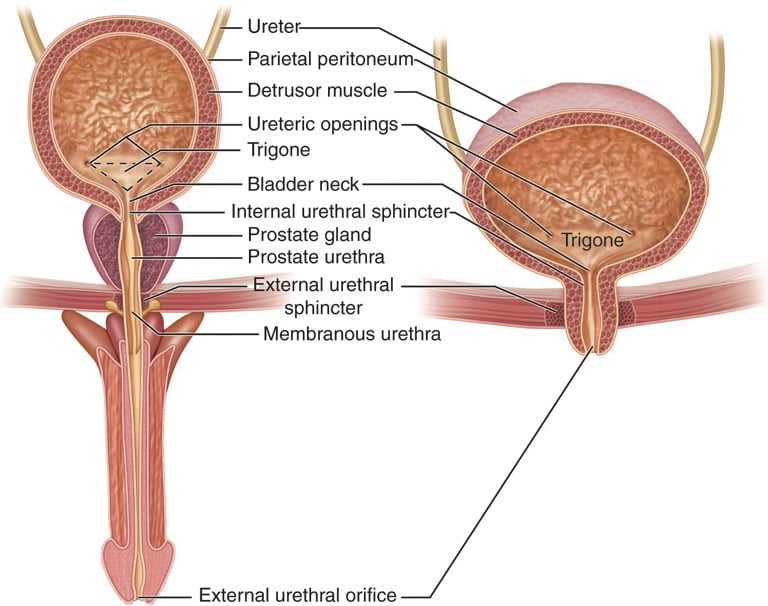
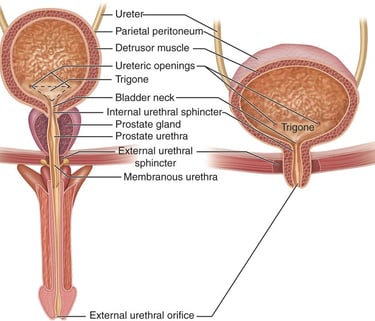
Anatomy and landmarks
Image 1 - Anatomy and landmarks.
Procedure:
Position the patient supine.
Don sterile gloves.
Prep the penis using chlorhexidine prep - soak the cotton balls in the solution and using the forceps provided in a catheter pack, thoroughly clean the glans, retracting the prepuce and cleaning the coronal sulcus. Be generous with the use of solutions and cotton balls, as it will prevent or minimise infections.
Place the drape over the site with the cutout for the penis.
With the left or nondominant hand, grasp the penis between the thumb and index finger and stretch it upwards towards the ceiling (perpendicular to the bed)
Use the prefilled lubricant syringe to instil lubricant, which ideally would contain an anaesthetic such as lignocaine. Squeeze out a drop or two of jelly onto the urethral meatus before inserting the tip of the syringe for extra comfort. Warn the patient that it will sting for a couple of minutes.
Push down on the plunger slowly and empty the syringe.
After 2 minutes, grasp the penis between the middle and index fingers and insert the cystoscope gently into the urethral meatus.
Ask your assistant to start the irrigation fluid (normal saline), which should improve your view as it distends the urethra.
Proceed proximally, keeping the lumen at the centre of the screen and guiding the scope with your left thumb and index finger
You will identify a few cardinal landmarks on your way to the bladder in the order of the membranous urethra (the narrowest part of the urethra), verumontanum, the prostatic lobes and finally the bladder neck.
At the membranous urethra - ask the patient to relax and take deep breaths in and out while your assistant squeezes on the bag of saline to distend the urethra.
Use the deflection lever to bypass the prostate, taking care not to scrape the lateral lobes, which can cause bleeding (not worrying, but it can be troublesome).
Finally, you will have entered the bladder.
Stop the irrigation if you have a clear view and begin to systematically examine the bladder.
Landmarks in the bladder to identify - Each operator will have their own system. our system is to identify the right and left ureteric orifices, the left and right lateral wall, dome, posterior wall and perform a “J” manoeuvre to visualise the bladder neck.
Take images of any regions of interest.
Withdraw the scope gently.
Always replace the foreskin to avoid a paraphimosis.
Movements of the cystoscope:
Deflection and inflexion using the lever - On the most commonly used cystoscopes, pushing the lever upwards turns the camera downwards and vice versa (the camera view and the lever are inverted and is also called reverse deflection).
J manoeuvre using the lever pushed fully down.
Flexion and extension at the wrist to rotate the scope right or left.
Systematic examination of the bladder:
Inspect the urethra carefully on entry and the prostate on exit. Resistance coupled with a visible narrowing that looks like a white ring in the urethra indicates a stricture and gentle dilatation can be attempted with the shorter graduated disposable dilators if more distal in the urethra or s shaped dilators if more proximal.
Allow the bladder to fill up completely without over distending the bladder which will cause pain. A well distended bladder will have obvious trabeculations.
If the bladder has a lot of debris, a luer lock syringe can be used on the working channel to aspirate and empty the bladder.
Identify the trigone by pushing the lever upwards to look down followed by right ureteric orifice (best done with irrigation turned off as the peristalsis of the UO and a jet of urine can be visualised.)
Follow the interureteric ridge or bar to find the opposite ureteric orifice.
Look at the left lateral wall of the bladder (or whichever side of the bar you ended up on.)
Direct the scope upwards and rotate it to completely visualise the lateral wall.
Do the same and look at the right lateral wall of the bladder.
Now comes the easy part - look at the posterior wall of the bladder and gently press over the suprapubic region to bring the dome of the bladder to bring the dome of the bladder into view (you will know that it is the dome when you see a big bubble of air or a few smaller ones.)
Finally, visualise the bladder neck with a “J” maneuvre. To do this, push the scope in while completely flexing the scope upwards (by pushing down.)
You should now be able to see the scope entering the bladder along with the trigone and the ureteric bar.
Post procedure:
Inform the patient about your findings.
Document your findings.
Ask the patient to empty their bladder.
Prescribe a back up course of antibiotics if they have a history of recent or frequent UTIs and tell them to use the antibiotics only if they begin to feel the symptoms of a UTI setting in.
Here’s a useful video on cystoscopy.
https://www.olympusprofed.com/uro/bladder-cancer/1266/
Images:
Thumbnail - Used under Creative Commons licence. Michael Reeve (https://commons.wikimedia.org/wiki/File:Cystoscopy-im-20050425.jpg), „Cystoscopy-im-20050425“, https://creativecommons.org/licenses/by-sa/3.0/legalcode
Image 1 - Used under the Creative Commons License - http://creativecommons.org/licenses/by/3.0/us/
UroMate
contact@uromate.com
© 2025. All rights reserved.
Disclaimer: The content on UroMate is intended for educational use by medical professionals only. It does not constitute professional medical advice, clinical guidelines, or a substitute for supervision or training. UroMate is not an official authority and accepts no responsibility for clinical outcomes. This site reflects UK clinical practice and may not apply elsewhere. Users must consult official sources such as NICE, EAU, or NHS protocols. Medical knowledge evolves, and while we strive for accuracy, content may not reflect the latest guidance. Not intended for patients or the general public. By continuing to use this site, you acknowledge and accept these terms.